


Whew. It’s been a while, but I’m here with the follow-up tutorial on Walk Cycles. Make sure to check out the previous tutorial on the subject before continuing.
In the previous tutorial, I went over what a walk cycle is. How they work, and how they are commonly implemented in video games. I discussed the pros and cons of walk cycles of various frames.
Today, we’re going to dive into the actual creation of such a walk cycle. We’ll begin with the front (south)-facing direction. Let’s start with a new sprite:
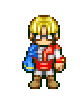
This guy.
I intentionally made this guy asymmetrical. His arms are different. This will force us to pay attention to each frame and prevent us from simply copying and flipping the sprite.
Creating a Classic RPG Walk
To begin with, let’s build towards that first step-idle-step walk cycle that is so common in RPGs.
The most movement—in some sprites and/or styles, all the movement—for this type of walk cycle is the responsibility of the limbs: the arms and legs move, which creates the the basic illusion of walking. For this animation, we need to have the arms swing back and forth, and we also need to boil down the lift, plant, push cycle to its bare minimum. Since we’re only recreating the limbs, we can keep the head and torso, and just copy and paste it to begin the animated frames.
Moving areas highlighted.
With such a limited number of frames, we only really want to convey movement by shifting the limbs around, for the most part. After that, darkening the “behind” limbs will help illustrate the three-dimensionality of the motion. The best way to do that is to minimize or eliminate the highlight color on those limbs.

Arms.
The arm on the left is the idle. The arm on the right is swinging backwards. It doesn’t look like much on its own, but when a third one is added—one that’s larger and brighter rather than smaller and darker, it creates the illusion of the swinging or pendulum motion.
I wrote this article before this one on purpose: in regards to copying and pasting, it’s often a good way to start. Copying the limbs, then moving them up or down a pixel or two can save a lot of time, but you’ll still want to redraw pieces of them (in this example, look at the character’s foot, left hand or right shoulder) or else the animation will look stiff.
Also note the small dip when the character walks—in this type of walk cycle, I typically make the stepping frames a pixel shorter than the standing frame. Lastly, remember that even though we call this the “three-frame” walk cycle, the animation actually uses four frames, as the “idle” or standing frame is used twice in the cycle.
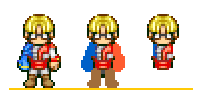
Stepping frames.
This is what it looks like in animated form:
3 frame walk
In the last article, though, I talked a lot about how much I hate this type of walk cycle. One of the many reasons is that it simply doesn’t accurately portray the movement of walking. This “three-frame” approach works well enough if you have technical limitations or need to work quickly.
But since our goal is to learn how to create a good walk cycle, we can’t stop here.
Making a Better Walk
Let’s give this character a larger walk cycle that allows us to study and create the lift-plant-push cycle of the legs. If you look at the animation above, the character’s legs appear to be doing some kind of awkward shuffle rather than a realistic cycle. This is because it uses that annoying idle frame—where both of the feet are planted firmly on the ground. This frame would never appear in a stronger walk cycle.
So if we’re dumping the idle frame, where do we start?
Personally, I like to animate each limb individually when approaching an animation that’s more than just a couple of frames. When it comes to walk cycles, I always start with the legs. Remember the lift-plant-push cycle of the legs—it becomes the core part of the walk that you build everything around it.
So let’s look at that motion.
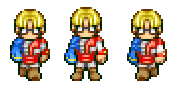
We’ll begin the stronger walk cycle with four unique frames. The original version had three frames, remember—but one of them was the idle frame (and it was repeated). Therefore, if we devote all four frames to the walk cycle itself, then we can have smoother movement that better protrays the motion of the limbs.
4 unique frames
Here is that same 4-frame animation in animated form:

4 unique frames.
It’s still jerky (remember that this serves as the base for more frames—these are essentially the “keyframes”)—but it does a better job of conveying a realistic walking motion. In particular, compare the feet from that animation to the 3-frame version from above. You’ll notice that, in this version of the animation, each leg comes forward, plants itself on the ground, and then recedes. Whereas in the other animation, the legs simply shuffled around.
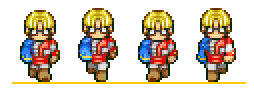
This is the leg, isolated on its own so we can look at what it’s doing:
4 frames
The foot kicks forward (frame 1), then plants itself on the ground (frame 2), then spends two frames pulling backwards (frames 3 and 4). The other leg is on the same cycle, except it’s at it’s furthest point back when the other leg is coming forward, and vice versa.
This 4-frame version is better than the classic shuffle-footed animation, but I want to take it further to really drive home the motion of the legs and feet.
Pushing it Further
Creating an eight-frame sprite isn’t much more complicated than what we’ve already done. Since we already have the “keyframes” from the four-frame animation, all we need to do is an additional four frames in between those, and use them to smooth the animation.
I don’t leave it there, however, or else that wouldn’t be making the most of each frame. With eight frames (or more), you’ll often be able to make better use of these kinds of animation techniques to exaggerate and emphasize the motion.
This is the next eight-frame version of the sprite:
8 unique frames
Again, pay attention to the motion of the legs and feet. With the smoother animation, there’s more emphasis on this lift-plant-push motion, which makes the walk feel more natural. You can clearly see each leg pick up the foot, plant the foot on the ground, and then pull it backwards—pulling it backwards means that he’s really pushing his body forward. In this example, it’s very pronounced for the sake of study—so on this guy it looks almost like he’s somewhere between marching and running. But the movement itself is clear.
Here are the frames laid out:
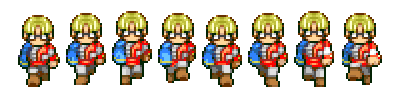
8 unique frames
He’s still not totally complete. There are plenty of opportunities for more details in the movement: lots of walk animations want some torso movement, for example. And this guy’s hair looks like it should have some movement to it.
I’ll come back to those details another time. For now, we should be comfortable creating a forward (south) facing walk.
I paid little attention to the arms in this tutorial—really focusing on the movement of the legs to propel the body realistically—because we’ll be working on the side-view walk in the next tutorial.
Until then.
Next: Walk Cycles Part 3