


It’s been a while since my last pixel art tutorial (over a year! sorry guys!), in which I introduced the basic ideas of animation. It’s time we dive into animation itself, and we’re going to start off by looking at one of the most important animations in game development: the walk cycle.
![]()
We’re going to be looking at the side view walk cycle (the front and back cycles will be explore in the next tutorial). Why? Multiple reasons. For one—it’s the most complicated, from a pixel art perspective. It typically takes more time to create the side view walk than the front or back views (the front and back walk cycles are easier to “cheat”).
But there’s a reason: the side view walk cycle best shows the motion of the limbs.
What happens when we walk?
Get up out of your chair and walk in a straight line. For reals; get up and do it. Pay attention to how your legs move, and why they move in the way that they do.
You’ll realize that you repeat a single motion alternating with each leg. Leg comes up, then plants, then the next one does the same. The planted leg doesn’t move, which forces the rest of the body forward. In essence, the walk cycle uses that leg to push the body.
It’s that pushing movement that is important to capture in a good walk cycle. When we recreate a walking motion in a sprite, the planted leg slides backwards instead of remaining in a fixed location. The body doesn’t move forward, but the static leg moves backwards.
This create the illusion of moving forward—when the walk cycle is then applied to movement in the game engine, it looks natural. Like the planted leg is pushing the body forward.
It’s important to have an understanding of how that works, and how we create the illusion of walking forward within a space that doesn’t actually move.
Three-Frame Cycle
First, let’s take a moment to look at different types of walk cycles.
The classic RPG walk cycle is a “three” frame step-idle-step cycle. It’s the one that’s used in old Final Fantasy games, and it’s used in the RPG Maker RTP graphics.
The cycle has “three” frames—one of which is the standing stille (idle) frame. The other two are two stepping frames. I put “three” in quotation marks because it actually uses four frames—but the idle one repeats. It goes “step-idle-step-idle”.
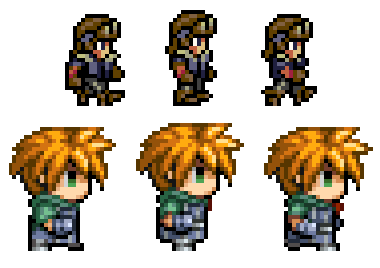
Classic three-frame walk cycle.
The reason that older games used this type of cycle was twofold: first, it was a limitation of the times. With fewer frames to worry about animating, older games engines would have an easier time displaying these walk cycles. I’m not going to go into all the details (nor are they relevent now), but this old method of animating a walk cycle was largely because of limitations that we no longer need to worry about.
Secondly, it was easy and fast. When you’re making over a hundred sprites for a full RPG, it might make sense to use this approach. It saves you at LEAST two frames per each direction of animation. And you’re re-using the idle frame in the walk cycle itself, so there’s no need to worry about a unique “standing still” sprite.
Here is an example of the classic “step-idle-step” cycle on a sprite of my own:
a
It looks pretty jerky, doesn’t it? That’s largely because of the size of the sprite. The classic RPG three-frame cycle doesn’t work with the larger sprites that we find in modern games (including the newer RPG Maker RTP sprites—I think it was a bad idea to not upgrade to a more modern walk cycle).
The biggest problem is that it actually makes no sense. Think back to when we described how walking actually works— when someone really walks, his legs move in a circular pendulum motion—lifting, planting and pushing. This “three”-frame walk cycle doesn’t communicate that idea.
When you’re really walking, at no point do both of your legs line up on the ground next to each other.
Sure, it emulates a walk well enough—and that’s why it was used in those older games. But when the sprites get larger and more detailed, it becomes more and more unnatural looking.
Let’s just put it out there: I hate the three-frame walk cycle. Like I said above, it has its place. Sometimes, it’s right for your project (for example—if you’re sticking to a specific lower resolution). Sometimes, the step-idle-step cycle is the way to go. But as technology changes, engines before more advanced, resolutions become larger, it increasingly becomes incorrect to default to that type of walk cycle.
Better Walk Cycles
So we don’t like the classic “step-idle-step” animation. That means that we can do better, right?
In order to convey a proper cycle that shows the motions of the legs, you’re going to want four frames at the minimum. Here is an example of a walk cycle with four frames:
b
It’s still not perfect—but it’s better than the first one. Here are the individual frames—zoomed in so we can look at them.
c
Note that you can clearly track the progress of each leg. The front (from our perspective as the viewer) leg is brought up and forward, then gets planted on the ground and slides backwards before repeating the cycle. This creates the pushing motion that we discussed earlier, while avoiding the awkwardness of the idle frame being shoved into the animation.
Each of the four frames has a specific purpose: the leg is in its next logical position in the cycle on each frame.
This animation, however, is still pretty jerky. A sprite of this size and detail deserves more than four frames. Let’s smooth it out.
More frames!
We’re living in the modern world—most engines that we work with today don’t have a limit on the amount of frames we can use. Even RPG Maker can easily be tweaked to give you more frames to work with than the default three-frame ugly animation.
This is the “final” version of the character from above, with eight frames of movement.
d
Now that is what I’m talking about. Let’s look at the individual frames:

e
Four of these frames are identical to the ones above, when we created the four-frame version of the walk cycle. These are the “keyframes”—the major ones that convey the primary motion of the legs and arms.
The other four frames come in between the keyframes—and they do a tremendous amount of work in smoothing the animation. When you look at the individual frames like this, some distortion becomes evident in the smoothing frames: the legs appear to shrink on the frames in between the keyframes, making it look strange to see all the frames lined up together. But when put together, it smooths the animation and makes for a more natural looking walk cycle.
The motion of the legs is clearer than ever: the lift-plant-push cycle is clear as day. You can clearly trace the motion of each leg. The half of the walk cycle where the leg is dragged backwards along the ground is the part that really “sells” the illusion—that creates the push that forces the entire body to move forward.
With pixel art, you will never really need more than eight frames for a walk cycle like this (if your sprite is big enough to want more than eight frames, then maybe you should rethink whether pixel art is the right approach to the project).
So we’ve covered the basics about walk cycles. This served as an introduction to the next few tutorials what I will be writing. I believe that it’s important to understand what you are creating before you create it—it will make the process go smoother in the long run. So with this under our belt, we will be building upon this knowledge to create some new walk cycles of our own.
In the next tutorial, we’re going to put some pixels together and make a walking sprite. Stay tuned.
Next: Walk Cycles Part 2