


This one’s been a long time coming—sorry for the wait, but it’s time to follow up my Using Map Coordinates tutorial with part two.
This tutorial builds on the contents of the first tutorial, so if you haven’t read that one, or if you need a refresher—go back and read it now. In it, we took a look at the grid plane in RPG Maker VX Ace, and how to store an event’s (or the player’s) map coordinates into variables. After that, we created a pressure-switch—as long as the player was standing on it, the door would open. And that’s where we left it. The player isn’t able to reach the door and stand on the switch at the same time, so we’re going to have to create a block that the player can push on top of that switch.
Let’s dive right into it.
Building Blocks
Creating the block is easier than you might think—create a new event and set it up like this:
 (click the image for a full view)
The sound effect is up to you, but the idea is that the player can move this event around. You can get a little creative with this—for example, you may want to set up the event so the player can pull the block as well as push (so the block doesn’t get stuck in corners). For the sake of this tutorial, we’re going to keep it simple. The block doesn’t need anything complicated for the puzzle to function—that’s all handled within the switch event.
If you want to test play the game now, go ahead. The player should still be able to open the door, but the block doesn’t activate the switch yet.
More of the Same
Open up that switch event again—as it is now, it does two things. First, it tracks the player’s X and Y coordinates on the map. After that, it uses conditional branches to check if those coordinates match the coordinates of the switch itself. If there’s a match, the switch is turned on that opens the door.
Now we pretty much want to do the same thing for the block. First, record the block event’s X and Y coordinates into variables. After that, you’d set up another set of conditional branches that—again—check if the block’s coordinates match up with the switch’s coordinates. If they line up, create a second switch (we’ll see why in the next step) that opens the door.
Now the first page of your switch event should look something like this:
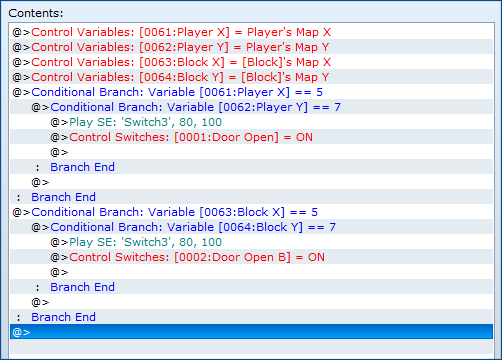
Remember that some of your numbers might be different—your switch might not be located at (5,7)—so make sure that your conditional branches are set up properly.
Don’t forget to go back to your door event and copy that second page for the second “Door Open” switch.
If you test play your game now, the door should open when you push the block onto the switch. Except the door stays open when the block is pushed away.
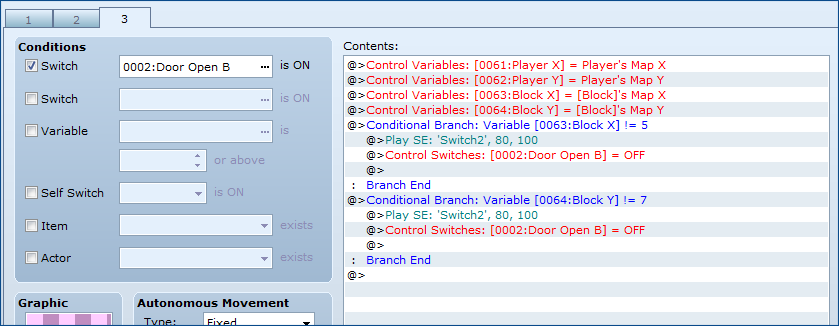
This takes us to the final step of the process. First thing you’d want to do is copy page two of the switch event. Then you need to make a few small changes to the new page: set the conditions so the switch turns itself back off when the coordinates of the block and the switch don’t match.
When it’s set up, it should look something like this.
 (click the image for a larger view)
Take a moment to think about what each page of this event is meant to do. The first page of the event tracks the location of the player and the block—if the player is standing on the same tile as the switch, the second page is activated. If the block is on the same tile as the switch, the third page is activated. The second and third pages both have the same function: they track when the player (page 2) or the block (page 3) move off of the switch, and in that case they turn the switches back off, closing the door.
Go ahead—test the game. Everything should work now. You should be able to slide the block onto the switch and walk right through that open door. :)
Saving time with Script Snippets
Before we call this tutorial finished, let’s talk about a shortcut that can save you a lot of time (and variables). It’s possible to save some time by using the “script” option of the conditional branch event command. It looks like this:
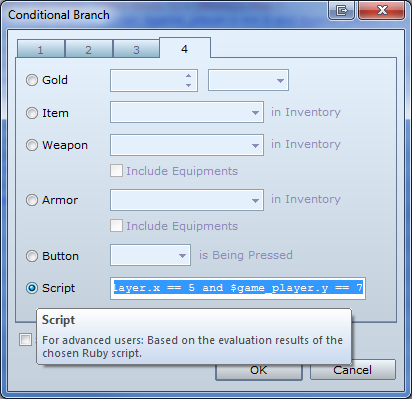
Instead of using two conditional branches and checking variables, you can use this line:
$game_player.x == 5 and $game_player.y == 7
The values may be different for you depending on the coordinates of the switch event, just like before (so if you copy and paste the code, make sure you change the values to match the coordinates of the switch in your game). The line accomplishes the same thing as the original nested branches that matched our variables with the numbers. It checks if the player’s coordinates match up with the switch (in this case, the coordinates are (5,7). The first half of the line checks the X coordinate, and the second part (after the “and”) checks the Y coordinate.
If you wanted to use a similar line to check if the block event is on the switch, you can use a line like this:
$game_map.events[003].x == 5 and $game_map.events[003].y == 7
In this example, the code checks if the X and Y coordinates of the event with the ID “003” match the coordinates (5,7). Your block event might have a different ID, so your line might look a little bit different. But all you’ve got to do is change the numbers and it should work out just fine.
Lastly, you can use a similar line to check if the coordinates of two events (or the player and an event) match up, without needing to know the fixed location of the event. For example—if your switch moves around, you wouldn’t be able to use constant numbers like the (5,7) in the above examples. In this case, you’d check the coordinates of the block against the coordinates of the switch itself.
$game_map.events[003].x == $game_map.events[@event_id].x and
$game_map.events[003].y == $game_map.events[@event_id].y
(this should be on one line when you plug it into your event)
This line is just like the one above (where “003” is the event ID of the block event), except the constant coordinates are replaced by the X and Y coordinates of the current event. “@event_id” replaces a number in the square brackets, which tells the program to read it as “this event”. In other words, you can use a line like this in any event and it will check if the event with ID “003” is on top of it. This is very useful for things that move around, and can save you a lot of trouble when setting up more complex puzzles for your games.
This is what the first page of my switch event looks like with these changes. Note that we no longer need to store coordinates into variables, because the code handles that for us.
 (click the image for a full view)
It’s a lot cleaner, yeah? If you make these changes, remember that you should go ahead and make similar changes on the second and third pages. When you do, you’ll have to make some small changes to the line, but the idea is the same.
On the second page, we’re checking to see if the coordinates of the player do not match the coordinates of the switch. You could create a conditional branch that uses this line of code:
$game_player.x != 5 or $game_player.y != 7
There are some small changes, but the line is very similar to the first line that we looked at. Instead of using “==“, you’ll want to use “!=“, which means “doesn’t equal”. We also replaced “and” with “or“. If we didn’t use “or“, the switch would only turn off is the player’s X and Y didn’t match the coordinates of the switch. That means that the switch would remain on even if the player was standing next to or above the switch.
This is what my second page looks like now:
 (click the image for a full view)
Looks pretty clean now. Between that line of code and the ones above, you should be able to figure out how to make similar changes to the third page, which tracks if the block event moves off of the switch.
Conclusion
This tutorial (parts one and two) have covered a tremendous amount of information—but now you should feel comfortable working with variables and the coordinate plane. You should be able to create the classic “pressure switch” puzzle now, and hopefully you are eager to test out this knowledge with other puzzles too.
My goal with these tutorials is not to simply teach you how to create the puzzle that we built here, but to give you the knowledge to do more. There are all sorts of things that can be created in RPG Maker VX Ace using the knowledge from this tutorial. I encourage you to experiment and build upon the lessons included in this tutorial, and look forward to seeing what you come up with.
If you have any questions or comments—or suggestions for future tutorials, let me know in the comments section.
Have fun! :)