


So I recently made a game in 30 days for an indie game competition. Here’s the game page (with screenshots and download, etc): Symbiote
Today, I want to talk about the player animations in Symbiote. One of my main goals with the game was to have really solid and fluid animations for the player. I think that I’ve mostly succeeded.
This short video shows the gameplay in symbiote and the final look of the animations in-game.
The original plan was to use traditional hand-drawn animation. That approach, however, would have taken me the entire month just to do the animations– and maybe longer. So instead I went with modular animation or “puppet animation”. This technique is A LOT faster (I was able to get all the base animations done in a single day).
This is the sheet of pieces that I used for the player character:
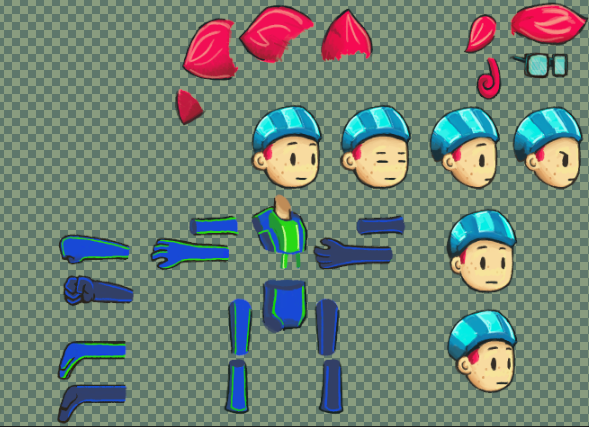
Sprite Pieces
I used Spriter Pro to put the pieces together and create the base animations. This is what the base idle pose looks like when put together in Spriter, using the pieces from the above image:
Aubrey in Spriter Pro
Now, Spriter has a huge amount of really cool features: bones, kinetic animation, etc. I didn’t use them.
Coming from a background in traditional animation, I wanted total control over the pieces. Instead of using bones, I positioned each keyframe manually. Most of the time, Spriter’s tweening functions did a great job smoothing the animation between my hand-made keyframes. Occasionally I would tweak the in-betweens (particularly for the more complex animations, like the attacks).
This is how the idle animation came out:
Idle Animation version 1
It looks really smooth, and I love the subtle squash-and-stretch effect (which I use often in my animation to give a stronger sense of weight). Of course, the problems with modular animation are evident: the joints connect awkwardly (and in the case of the shoulder, don’t connect at all).
There are some solutions for this that work within the modular animation approach: for example, drawing rounded shoulders or individual pieces for the joints themselves. These solutions would work for some types of animations, but I knew that I would need a huge variety of animations — and ones that made heavy use of squash-and-stretch techniques, and that would require me to create a lot of different versions of each body part: I felt that at that point, the time commitment wouldn’t be much different than animating in the old fashioned way.
The running animation had similar problems:
Run Animation version 1
Beautifully bouncy and full of character, but those joints look painful.
There were also other problems: notice the blank areas underneath the hair. I thought about changing the hair pieces themselves to have a red “base” which would serve as the back of the head, but that limited some of the ways I wanted the hair to move in other animations. Creating a simple red “back of head” layer could have worked, but at that point I knew that I planned to manually clean up the animation anyway.
I used these “puppet versions” of the animations for prototyping the game, and for the majority of the development process. They functioned just fine in-game.
Towards the end of development, when all the programming was finished and the level designs were implemented, it was time to dive into polishing the graphics. So I took each frame of the player’s base puppet animations, popped them into photoshop, and went at them with my wacom pen:
Idle Animation version 2
You can see some jittery evidence where I manually edited the frames: the shoulders, elbows and knees were the areas of the biggest concern.
The jittery line on the hip betrays the haste with which I went through this process (there were a lot of frames, after all)– but the classic artist’s trick hides these problems: the original images are all HUGE and they downscale for the game itself. The images you see on this page are downscaled from the working size, and they’re still about twice as large as the in-game sprite.
And the run animation:
Run Animation version 2
Overall, I only spent two and a half of my development days on the hero’s animations. Half a day turning my concept art into useable sprite pieces, one day making all my base puppet animations in spriter, and one day fine-tuning each animation in photoshop.
With more time, I’d smooth the animations even further (for example, the way she turns her head in the run animation above seems kind of choppy compared to the rest of the animation)– but those details likely wouldn’t even be noticed in this project. Again, that magical downscaling trick hides any problems with the animations.
I’m really happy with the end result. The modular approach to animation saved me a HUGE amount of time, and going in to manually clean up the sprites ended up giving them that traditional-animation feel that I love so much. The blend of the techniques worked really well, and I think that I’ve succeeded when it comes to my goal of solid-yet-fluid animations for Symbiote‘s player character.
In future projects, when I’m not on such a strict deadline, I imagine that I can come up with some really cool stuff.
Thanks for reading. :)